How To Install
From GeoSharing
This installation manual is divided into two parts. The first part presents preliminary configurations that must be done before starting any development on the Opemoko Neo FreeRunner (GTA02). The second part describes the technical steps to follow in order to install the GeoSharing project on the Neo FreeRunner.
All those steps have been tested on a Neo FreeRunner and on a laptop running Ubuntu 10.10 with access to root privileges.
Contents |
Preliminary configurations
This section consists in three parts. The first thing to do is to configure a connection between the Neo FreeRunner and a computer via a USB cable. Most of the operations that must be executed on the Neo FreeRunner are easily performed on a computer disposing of a keyboard and a larger screen than the GTA02. A SSH connection should thus be established from the computer to the Neo FreeRunner in order to have access to it.
The second part details the installation steps of an operating system (OS) on the Neo FreeRunner. This operation is made possible thanks to the communication channel created before via the USB cable. The operating system called SHR was chosen to be used in the scope of the GeoSharing project.
The third part shows how it is possible to share the internet connection of a computer with the Neo FreeRunner via the USB cable.
USB interface configuration
An important thing to notice is that the USB connectivity is considered as an ethernet connection by both the Neo FreeRunner and the computer. This implies the use of IP addresses to identify both ends of the connection. By default, the Neo FreeRunner has a static IP address: 192.168.0.202 and nothing must be done to change that. The goal is then to configure the computer to have an IP address in the same sub-network than the Neo FreeRunner to be able to communicate with it.
1) The first thing to do on the computer is to create an alias for the IP address of the Neo FreeRunner. Edit the file /etc/hosts by adding the line:
192.168.0.202 openmoko
2) There exists two possible methods to set up an ethernet connection between both devices via the USB cable. On the computer, it is possible to choose:
Via the network manager
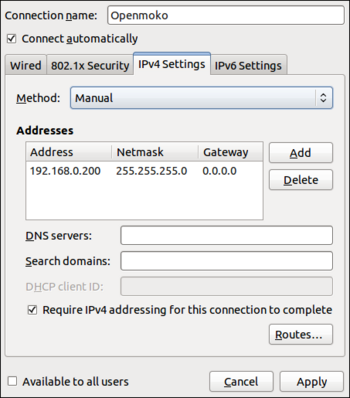
The easiest way to set up the connection with the Openmoko is to create a new connection (called Openmoko here) in the wired networks tab of the computer network manager. For this new connection, choose a static (manual) IP address: 192.168.0.200.
Without the network manager
- On the computer, open the file located at the following location: /etc/network/interfaces and add the following lines at the end of the file:
# The Openmoko network interface
auto eth1
iface eth1 inet static
address 192.168.0.200
netmask 255.255.255.0
- On the computer, restart the network service by running the following command as root:
# /etc/init.d/networking restart
3) If an operational OS is running a SSH daemon on the Neo FreeRunner, it is possible to establish an SSH connection from the computer to the root session of the Neo FreeRunner.
$ ssh root@openmoko
root@om-gta02 ~ #
If it is not the case (i.e. there is no SSH d\ae mon or no operating system at all), the Neo FreeRunner can be flashed with, for example, the operating system used in the scope of the GeoSharing project: SHR.
Flashing the SHR operating system on the Neo FreeRunner
The easiest way to flash the Neo FreeRunner is to use neoTool on the computer. It is mandatory to install dfu-utils via the Synaptic Package Manager of the computer before running neoTool. The version of neoTool that have been used to realise this manual is the version 1.3.
Before going any further, the Neo FreeRunner must be connected to the computer with the USB cable, the IP address of each device must have been previously configured and the Neo FreeRunner must be booted on the NOR memory (POWER + AUX buttons).
1) The first step is to copy the bash script that can be found at http://users.on.net/~antisol/neotool into an empty file on the computer. Rename this file neoTool and give it the execution rights.
$ chmod u+x neoTool
2) The second step is to run neoTool on the computer with root privileges.
$ sudo ./neoTool
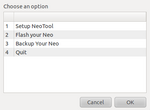
3) The application is now running and the interface looks like:
4) On the computer, download the latest version of the SHR operating system. The version of SHR used to realise this manual is the version SHR-testing 2.6.29-oe11. Images of the SHR operating system can be found at http://build.shr-project.org/shr-testing/images/om-gta02/. Two files are required:
- lite-om-gta02.jffs2
- uImage-*.bin
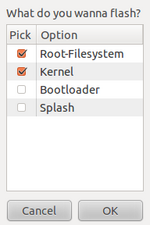
5) In neoTool (which is running on the computer), select the second item Flash your Neo and click OK. The interface looks like:
On the next screen, don't change anything and click `OK'.
6) The path to the *.jffs2 and the *.bin files are respectively asked.
7) Click on the OK button of neoTool to launch the flashing process.
8) When the process is done, the Neo FreeRunner restarts automatically and the new operating system is ready to be used.
Internet connectivity
When the operating system is installed and running, the configuration steps required in order to share the internet connectivity of the computer with the Neo FreeRunner via the USB cable are the followings. These steps must be done on the computer connected to the Neo FreeRunner.
\begin{enumerate} \item On the computer, edit the file \texttt{/etc/sysctl.conf} \begin{lstlisting} $ gedit /etc/sysctl.conf \end{lstlisting}
\item Look for the following line in this file: \begin{lstlisting}
- net.ipv4.conf.default.forwarding=1
\end{lstlisting}
and uncomment it (remove the \# character if not already done).% This change will be effective at the next reboot of the computer.
%\item The following command can be use to make the previous change effective directly: %\begin{lstlisting} %$ sudo sysctl -w net.ipv4.conf.default.forwarding = 1 %\end{lstlisting}
\item The iptables of the computer must be configured such that the computer behaves as a simple router for the Openmoko. The computer must forward packets coming from the Neo FreeRunner to the internet and the other way around. Edit the file \texttt{/etc/rc.local}:
\begin{lstlisting} $ gedit /etc/rc.local \end{lstlisting}
and add these lines at the end of the file:
\begin{lstlisting} /sbin/iptables -P FORWARD ACCEPT /sbin/iptables --table nat -A POSTROUTING -s 192.168.0.202/32 -o iface -j MASQUERADE \end{lstlisting}
where iface corresponds to the interface of the computer connected to the internet (wlan0, eth0, eth1, ...). %These changes also take effect only after a reboot. To make them effective directly, type the same command in a terminal by replacing \textbf{/sbin/} by \textbf{sudo}. \item The computer have now to be rebooted. \end{enumerate}
The internet connection of the computer is now shared with the Neo FreeRunner. In order to check if the sharing of the internet connection is well configured, from the Neo FreeRunner, perform a \texttt{ping} to \texttt{www.google.com} and the results should look like this:
\begin{lstlisting} root@om-gta02 ~ # ping www.google.com PING www.google.com (66.102.13.103): 56 data bytes 64 bytes from 66.102.13.103: seq=0 ttl=55 time=19.548 ms 64 bytes from 66.102.13.103: seq=1 ttl=55 time=35.519 ms (...) \end{lstlisting}
%% ===================================================================
\newpage
%% ===================================================================
\section{GeoSharing project installation}\label{app:geosharing+on+neo} Since the GeoSharing project is based on the OLSRd Linux d\ae mon and on tangoGPS, it is mandatory to compile and install those two applications as well as the GeoSharing application.
Before going any further, extra packages such as a C compiler (\texttt{gcc}) and libraries (\texttt{libglib}, \texttt{libconfig}, \texttt{libgps}, etc.) need to be installed on the Neo FreeRunner. In order to install these packages, an internet connection is required. The following commands must then be executed on the Neo FreeRunner.
\begin{lstlisting}[label=packages,caption=Packages to install on the Neo FreeRunner.] root@om-gta02 ~ # opkg update
root@om-gta02 ~ # opkg upgrade
root@om-gta02 ~ # opkg install make gcc gcc-symlinks libc6 libc6-dev binutils binutils-symlinks coreutils kernel-module-tun kernel-module-tunnel4 mdbus libglib-2.0-dev libdbus-glib-1-dev gconf orbit2 libidl-2-0 policykit eggdbus libexif12 libgps gpsd-dev gtk+ gconf libxml2-dev libsoup-2.4-dev bluez4-dev curl curl-dev libexif-dev libconfig-dev \end{lstlisting}
Now that the needed packages are installed, OLSRd, tangoGPS and the GeoSharing application can be compiled and installed on the Neo FreeRunner.
\subsection{OLSRd Linux d\ae mon}\label{app:olsrd+on+neo} As stated in Section \ref{sec:tech:olsrd}, the compilation process of OLSRd requires \texttt{bison}\index{Bison} and \texttt{flex}\index{Flex} packages to compile the syntactical analyser used inside OLSRd. Since the version of SHR proposed in this manual does not provide those packages (\texttt{bison} and \texttt{flex}) in the package repository, the compilation of the syntactical analyser have to be done on another version of the OS.
The entire compilation and installation process of OLSRd on the Neo FreeRunner is detailed in the following steps. Some steps are performed on a Neo FreeRunner running the SHR-unstable version of the operating system while some other steps are performed on the SHR-testing version. The SHR-unstable version provides much more packages in the package repository. \texttt{Bison} and \texttt{flex} are fortunately part of the list. On the Neo FreeRunner running the SHR-unstable version, all the packages listed in Listing~\ref{packages} have been installed. In addition to them, \texttt{bison} and \texttt{flex} have been installed as well.
A computer is used to easily manage file transfers between the Neo FreeRunner devices.
%% =================================================================== \newpage %% ===================================================================
\begin{enumerate} \item On the computer, download the last stable release of OLSRd (*.tar.gz file) from \linebreak[4] \url{http://www.olsrd.org}. The version of OLSRd used to realise this manual is the version 0.6.
\item Extract the archive content on the computer filesystem and open a terminal pointing to the folder that has just been extracted.
\item At this time, only the Neo FreeRunner running SHR-unstable must be connected to the computer. From the computer, copy the entire olsrd folder to the Neo FreeRunner running SHR-unstable.
\begin{lstlisting} $ scp -r olsrd-0.6.0 root@openmoko:/home/root/ \end{lstlisting}
\item On the Neo FreeRunner running SHR-unstable, open a terminal, go in the olsrd folder and compile the project. This process may take a while.
\begin{lstlisting} root@om-gta02 ~ # cd olsrd-0.6.0 root@om-gta02 ~ # make \end{lstlisting}
\item From the computer, it is now necessary to collect the generated files from the SHR-unstable device.
\begin{lstlisting} $ scp -r root@openmoko:/home/root/olsrd-0.6.0 /home/user/ \end{lstlisting}
\item The Neo FreeRunner running SHR-unstable must be disconnected from the computer and may be shut down. This device is never used anymore.
\item The Neo FreeRunner running SHR-testing has to be connected to the computer.
\item From the computer, copy the entire olsrd folder to the Neo FreeRunner running SHR-testing.
\begin{lstlisting} $ scp -r olsrd-0.6.0 root@openmoko:/home/root/ \end{lstlisting}
\item On the Neo FreeRunner running SHR-testing, open a terminal, go in the olsrd folder and install the compiled OLSRd d\ae mon.
\begin{lstlisting} root@om-gta02 ~ # cd olsrd-0.6.0 root@om-gta02 ~ # make install \end{lstlisting} \end{enumerate}
The OLSRd d\ae mon is now installed on the Neo FreeRunner.
%% =================================================================== \newpage %% ===================================================================
In the scope of the GeoSharing project, the BMF plugin (always provided in the OLSRd archive file) is required. Its compilation and its installation are quite easier than for the OLSRd d\ae mon. On the Neo FreeRunner, open a terminal, go in the folder located at \texttt{/home/root/olsrd-0.6.0/lib/bmf}, compile and install the plugin.
\begin{lstlisting} root@om-gta02 ~ # cd /home/root/olsrd-0.6.0/lib/bmf root@om-gta02 ~ # make root@om-gta02 ~ # make install \end{lstlisting}
The final configuration required for the d\ae mon to be fully effective is a configuration file. This file is located at \texttt{/etc/olsrd.conf}. There are two things to adapt for the GeoSharing project: \begin{enumerate} \item At the end of the file, the OLSRd interface must be specified. Since OLSRd must be running on the Wi-Fi interface of the Neo FreeRunner, the OLSRd interface should be \texttt{eth0}. On the Neo FreeRunner, the \texttt{VI} editor can be used to edit this file accordingly. \begin{lstlisting} Interface "eth0" { Mode "mesh" } \end{lstlisting} \item In the plugin section of the file, an entry must be added to load the BMF plugin when the d\ae mon is launched. On the Neo FreeRunner, the \texttt{VI} editor can be used to edit this file accordingly. \begin{lstlisting} LoadPlugin "olsrd_bmf.so.1.7.0" { # no option } \end{lstlisting} \end{enumerate}
The OLSRd Linux d\ae mon is now ready to serve the GeoSharing objectives in terms of network topology management.
\subsection{TangoGPS application}\label{app:tango} TangoGPS is provided in some editions of the SHR-testing version. But, as stated in Section~\ref{sec:choice+gui}, a modified version of tangoGPS has been developed in the scope of the GeoSharing project. This new version adds a plugins interface allowing plugins to easily interact with tangoGPS. The compilation and the installation of the modified version of tangoGPS is described in the following steps.
%% =================================================================== \newpage %% ===================================================================
\begin{enumerate} \item Before going any further, make sure that the Neo FreeRunner is free of any version of tangoGPS. On the Neo FreeRunner, open a terminal and execute the following command: \begin{lstlisting} root@om-gta02 ~ # opkg remove tangogps \end{lstlisting}
\item On the computer, download the latest version of tangoGPS-modified from \linebreak[4 ] \url{http://download.geosharing-project.org}.
\item Extract the archive content on the computer filesystem and open a terminal pointing to the folder that has just been extracted.
\item From the computer, copy the entire tangogps folder to the Neo FreeRunner.
\begin{lstlisting} $ scp -r tangogps root@openmoko:/home/root/ \end{lstlisting}
\item On the Neo FreeRunner, open a terminal, go in the tangogps folder, compile and install the project. Pay attention to the third, fourth and fifth commands. They are really important to avoid compilation issues. This process may take a while.
\begin{lstlisting} root@om-gta02 ~ # cd tangogps root@om-gta02 ~ # sh configure root@om-gta02 ~ # CFLAGS="-march=armv4t" root@om-gta02 ~ # PACKAGE_CFLAGS="-lconfig" root@om-gta02 ~ # PACKAGE_LIBS="-lconfig" root@om-gta02 ~ # make root@om-gta02 ~ # make install \end{lstlisting} \end{enumerate}
TangoGPS is now ready to serve the GeoSharing objectives in terms of graphical display.
\subsection{WEP security}\label{app:wep} On the Neo FreeRunner, the wireless interface is denoted as \texttt{eth0}. The following lines need to be added in the configuration file of the device interfaces in order to set the wireless network in ad hoc mode with the WEP security enabled. On the Neo FreeRunner, the \texttt{VI} editor can be used to edit the file located at \texttt{/etc/network/interfaces} accordingly.
\begin{lstlisting} auto eth0 iface eth0 inet static address 10.0.0.1 netmask 255.0.0.0 network 10.0.0.0 wireless-mode ad-hoc wireless-essid GeoSharing wireless-key F4C3DEB3BE \end{lstlisting}
Once the configuration file has been modified, the network interfaces have to be restarted. The simplest solutions are to restart the device or execute the following command in a terminal of the device:
\begin{lstlisting} root@om-gta02 ~ # /etc/init.d/networking restart \end{lstlisting}
\subsection{GeoSharing}\label{app:geosharing+on+neo} Now that OLSRd Linux d\ae mon and tangoGPS are correctly installed, the main module of the GoeSharing project must be installed as well. This installation is detailed in the following steps.
\begin{enumerate} \item On the computer, download the latest version of the GeoSharing application from \linebreak[4] \url{http://download.geosharing-project.org}.
\item Extract the archive content on the computer filesystem and open a terminal pointing to the folder that has just been extracted.
\item From the computer, copy the entire geo\_sharing folder to the Neo FreeRunner.
\begin{lstlisting} $ scp -r geo_sharing root@openmoko:/home/root/ \end{lstlisting}
\item On the computer, download the latest version of the run\_geosharing.sh script from \linebreak[4] \url{http://download.geosharing-project.org}.
\item From the computer, copy the run\_geosharing.sh script to the Neo FreeRunner.
\begin{lstlisting} $ scp run_geosharing.sh root@openmoko:/home/root/ \end{lstlisting} \end{enumerate}
This script (shown in Listing~\ref{list:run}) is the entry point of the GeoSharing application. It first configures the wireless network interface. Then, it launches the OLSRd d\ae mon. Finally, it compiles the GeoSharing application if it is not already done and launches it.
As explained in Chapter~\ref{chap:GPS}, two methods for GPS data retrieval have been implemented. By default, the D-Bus method is used to retrieve GPS data. To use the TCP method instead, on the Neo FreeRunner, using \texttt{VI}, edit the script \texttt{run\_geosharing.sh} and replace the last line: \begin{lstlisting} ./geo_sharing -m dbus \end{lstlisting}
by
\begin{lstlisting} ./geo_sharing -m tcp \end{lstlisting}
%% =================================================================== \newpage %% ===================================================================
\begin{lstlisting}[label=list:run,caption=The run\_geosharing.sh script is the entry point of the GeoSharing application.]
- !/bin/sh
cd /home/root/ CURRENT_STATE=`mdbus -s org.freesmartphone.ousaged /org/freesmartphone/Usage org.freesmartphone.Usage.GetResourceState WiFi`
if [ $CURRENT_STATE = "False" ]; then echo WiFi is currently down ... Setting it up now ... mdbus -s org.freesmartphone.ousaged /org/freesmartphone/Usage org.freesmartphone.Usage.SetResourcePolicy WiFi enabled mdbus -s org.freesmartphone.ousaged /org/freesmartphone/Usage org.freesmartphone.Usage.RequestResource WiFi ifconfig eth0 up /etc/init.d/networking restart else echo WiFi is already up ! fi
echo "0" > /proc/sys/net/ipv4/icmp_echo_ignore_broadcasts
mkdir -p /dev/net mknod /dev/net/tun c 10 200 chmod 0700 /dev/net/tun olsrd
cd /home/root/geo_sharing/ make clear ./geo_sharing -m dbus \end{lstlisting}
This script eases the launch of the GeoSharing application. Besides, it can be executed for two different purposes. \begin{itemize} \item The GeoSharing application can be launched by tangoGPS when an end-user clicks on the GeoSharing entry of the plugins menu. The interactions with the end-user takes place through the graphical interface provided by tangoGPS. In order to provide to tangoGPS the path to the run\_geosharing.sh script, the tangoGPS configuration file (located at \texttt{/etc/tangogps\_plugins.conf}) has to be filled accordingly.
\begin{lstlisting}
- TangoGPS Plugins Interface
nbr_plugins = 1;
Plugin1 = { name = "GeoSharing"; path = "sh /home/root/run_geosharing.sh"; options = ""; running = "/tmp/geosharing.run"; }; \end{lstlisting}
\item The GeoSharing application can also be launched alone in a terminal. The interactions with the end-user takes place through messages displayed in the terminal.
\end{itemize}
%% =================================================================== %% ===================================================================
\chapter{Licence}\label{app:sec:licence}\index{Licence} GeoSharing is distributed under the ``Creative Commons BY SA\footnote{~\url{http://creativecommons.org/licenses/by-sa/3.0/legalcode}}\index{Creative Commons}.
\begin{itemize} \item You are free:
\begin{itemize} \item to \textbf{Share} --- to copy, distribute and transmit the work \item to \textbf{Remix} --- to adapt the work \end{itemize}
\item Under the following conditions:
\begin{itemize} \item \textbf{Attribution} --- You must attribute the work in the manner specified by the author or licensor (but not in any way that suggests that they endorse you or your use of the work). \item \textbf{Share Alike} --- If you alter, transform, or build upon this work, you may distribute the resulting work only under the same or similar license to this one. \end{itemize}
\end{itemize}


